We had a wonderful summer vacation, this year at Andaman and Nicobar Islands. The scenic seashores, calm not-so-populated beaches, and the wonderful islands made for a good, much-needed stress buster. The vacation just got over before I realised, which happens on every good vacation.
What lasted long after the vacation was the amazing seashell shapes you find on the shores. This is not the first time I get stuck with some questions on how something can occur in nature so perfectly. And this time, it was the shape of the seashells. Am sure, this question had occurred to me many times during my curious childhood. But this time it stuck hard and stayed. I couldn’t stop thinking about the math behind the seashell shapes and started exploring how they are naturally formed. Got some good videos online and learnt that it was simple calcium deposit over time that produces such stunning shapes naturally by some creatures.
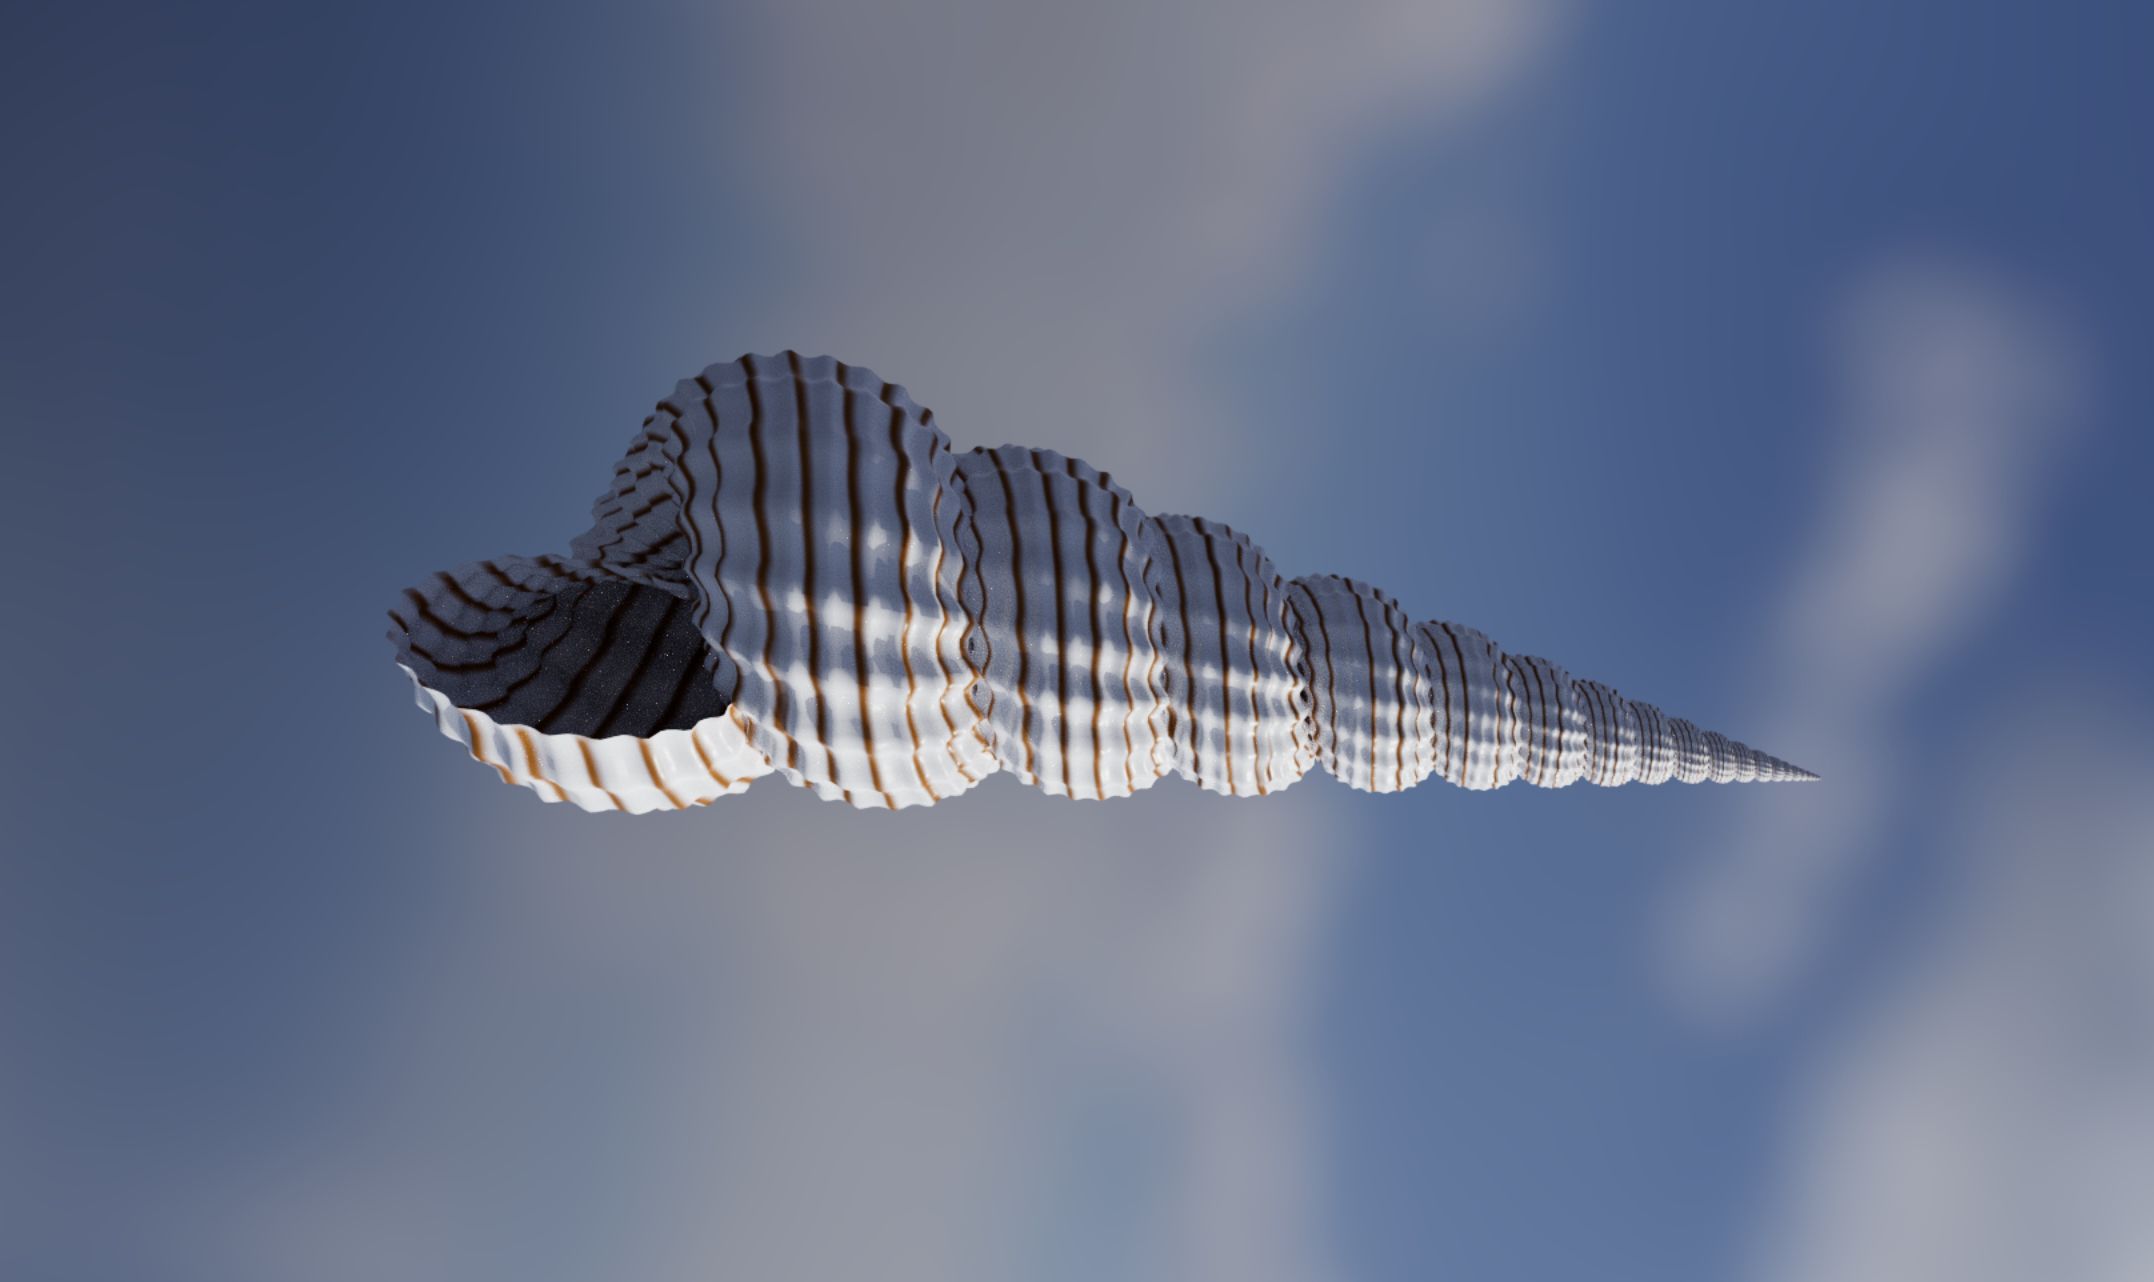
Despite many good videos on the internet explaining the formation of shells, I still couldn’t stop myself from recreating them mathematically. Another new project was born. What started as a simple script to plot a 2D graph of spirals finally ended up becoming a 3D mesh generator in Rust. No doubt, I’ve become a Rust fan nowadays, gone is the deep love I had for C++ for 25 years (my first love), but let’s leave that story for another article in the future. What surprised me was how many layers it took to make a shell actually look like a shell. First the shape, then the surface texture, then the colour, and finally the way it catches the light. Let me walk through them one layer at a time.
It begins with a coil
It all started with a paper from 1962, “Computer as Aid in Describing Form in Gastropod Shells”, where the author David Raup studied the math behind the shell shapes. The paper describes the mathematical equation based on 4 parameters,
W(Expansion rate): The rate at which the cross-sectional area of the shell’s tube (whorl) increases as the shell grows.D(Distance of the generating curve from the axis): Determines whether the shell is widely coiled (creating a hollow central opening called an umbilicus) or tightly coiled with a solid central pillar (the columella).T(Translation Rate): The speed at which the generating curve moves downward along the central coiling axis (the spire height).S(Shape of the generating curve): Defines the exact geometry of the shell’s opening (aperture), such as oval, circular, or crescent-shaped.
The mathematical formula for the shell shape comes down to:
Where:
- is the total angle of rotation (in radians) around the coiling axis.
- is the radius at angle .
- is the translation height along the central vertical axis at angle .
- and are the initial baseline positioning coordinates at .
| Parameter | Mathematical Definition |
|---|---|
| Whorl Expansion Rate () | |
| Distance from Axis () | |
| Translation Rate () |

Let us skip the math for a while and focus on the shape. Raup’s paper gives us four parameters. To actually draw a shell we need one more: n, the number of whorls, which is just how many times the tube wraps around before it stops. That handful of five (W, D, T, n and the aperture shape S) is enough to reproduce a huge range of real shells. Pick a species from the list, or drag the sliders yourself, and watch the same equation morph from a flat nautilus into a tall auger.
Nature isn’t this smooth
Got the math correct, but this is actually not how the shells look in the real world. At least not as perfect as a math function, as nature plays its game differently. So I had to go a little further and add more parameters. These extra parameters don’t touch the coil math at all. They just ride on top of it, as tiny in-and-out nudges of the tube’s surface as it grows. Three families cover most of what you see on a real shell:
- Ribs and cords: regular ridges running across the whorl (axial ribs) or along the coil (spiral cords). Cross the two and you get the cancellate lattice of a nutmeg shell.
- Nodules and spines: bumps placed on a grid around the tube, from blunt beads all the way to the long needles of a Venus comb murex.
- Varices: a few thick ridges that mark where the shell paused and reinforced its lip, like the three flanges on a frog shell.
Mathematically each one is just a periodic displacement added to the tube’s radius, a function of (along the coil) and (around the aperture), so the logarithmic spiral underneath stays exactly as it was.
Painted while it grows
Now the shapes are close to what you find on a seashore. I can recreate most of the common shells I see with just these parameters. But one thing is still missing. Every shell so far is a plain, lifeless off-white, while real shells are painted, with bands, flames, tents, spots and nets. And here is the surprising part. Those patterns come from the same growth process as the shape itself. A thin strip of cells at the growing edge switches pigment on and off as the shell grows, like a one-dimensional reaction-diffusion system running along with the coil. That is Layer 3, colour and pigment.
The viewer below paints the shell as it grows. Each pattern, whether it is spiral bands, axial stripes, oblique flames, chevron tents, spots, or a net, is laid down using the same growth coordinates we have used all along: θ along the coil and φ around the aperture. It opens on the bold dark bands of a grove snail. Pick another species to see the nautilus’s flames, the nutmeg’s net or the auger’s spots, change the scale and contrast, and recolour it with the three palette stops.
Catching the light
This is about as far as the geometry can take us. The shape looks right, but how a shell really looks depends on how light behaves on its surface. So one more step. Add a few parameters for the surface itself, then render it with PBR++ or path tracing. Path tracing just simulates how light bounces around based on how each surface is set up. Another bit of maths, this time for light. These are the material and lighting properties, the final layer.
Four parameters cover most of it. Glossiness goes from matte chalk to wet polish. A Gloss coat adds the shiny clear layer you see on an olive or a cowrie. Translucency lets light pass through a thin shell. And Iridescence is the colour shift you see on nacre and pearl. The viewer renders all this with PBR++, lighting the shell inside a green, leafy environment so a glossy finish picks up some real reflections. And if you want the proper photo-real render, the Path Tracing ↗ button sends the same shell, with its shape, ornament, pigment and finish, over to the full Avarta renderer. The live demo even hides a few easter eggs, like the unique share-ID every shell gets, if you go poking around.
The whole shell, from scratch
And that is the whole stack: a logarithmic coil from five numbers, ornament riding on top, pigment painted by the same growth, and a material that catches the light. Four small layers of maths that, put together, rebuild almost any shell you can pick up off a beach.
What still gets me is how little it takes. A few numbers, repeated over and over as the shell grows, and out comes all of this. The colour is not even separate. The same growing edge that builds the shape also paints it. There are tens of thousands of shelled species in the sea, and this same small handful of rules covers most of them. Nature is not really drawing a shell. It just follows a few simple steps, one tiny bit at a time, and the shape comes out on its own. A real shell is still more than its numbers, of course. Pick one up and you will find chips, repairs and stains, a whole little life on it that no slider can capture. But I understand it a lot better now, and that was the whole point.
If you want to grow your own, the full shell builder is live for you to play with. Mix the sliders, paint it however you like, build a shell that has never existed, and render it for real. And if you want to see how the mesh is actually built, the code is all on GitHub. Under the hood it is really just a bit of math turned into a 3D model.
After rebuilding the shells I had picked up on that beach, and finally understanding how nature grows them, the curious child in me could rest. At least until the next thing catches my eye.